How to Rig a Worm for Bass: Popular Rigs Explained
When you first start fishing, it all seems pretty simple. You string a worm onto a hook, clip on a bobber, and maybe a few split shot weights, and you toss it out. No big deal, right? Well, it gets a lot more complicated than that.
In the 70 or so years since bass fishing became a real sport and pastime, anglers have found new and exciting ways to use modern gear to create the best presentation possible in a large variety of situations. This goes for live bait and synthetic lures.
Today, whether you’re brand new and need a little guidance, or you’re a seasoned vet just looking to branch out a bit from the same old Texas rig, we’re going to highlight the most popular rigs, how they’re made, what you can use with them, and most importantly, how to rig a worm for bass fishing.
1: The Texas Rig
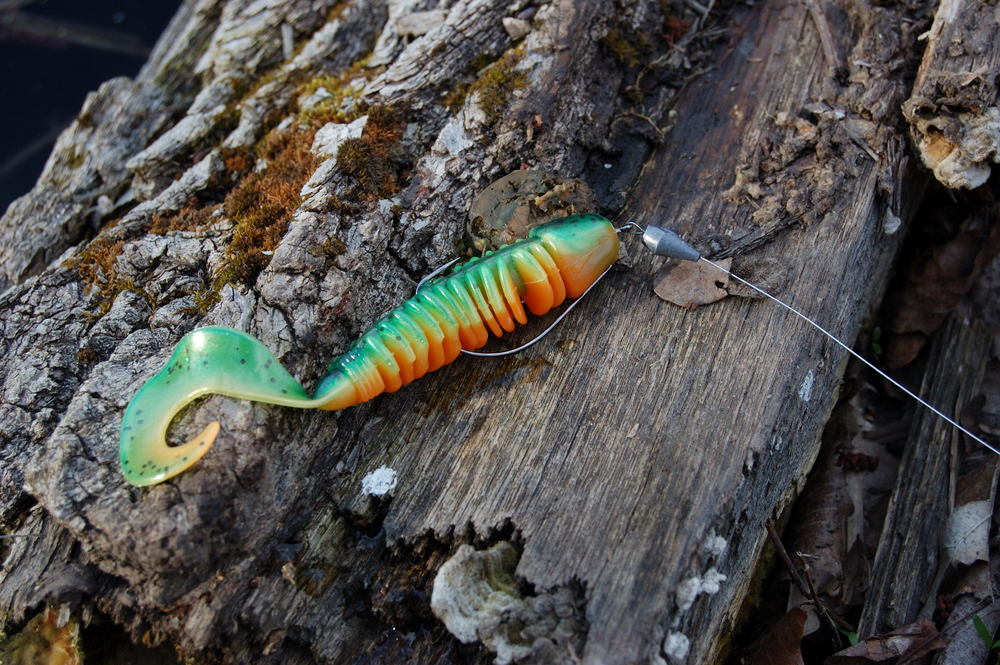
First and foremost, you need to know about the Texas rig. It’s simple, effective, and extremely flexible. If you’ve been using lures for any real period of time, you probably know all about this one. It’s the most common lure rig in the sport. If you’re just starting out, this should be the first one you go for.
This is mostly used for lures, and it’s specifically designed to be used with synthetic stick baits or “worms”. However, it can be used with creature baits, swimbaits, and even live worms if you want to try it out and have Canadian Nightcrawlers on hand.
To make the rig, you need a worm hook sized to the lure or bait you’re using and a bullet weight that is light or heavy enough for the lure you’re using and the speed of the descent you’re looking for.
To start, slip the bullet weight onto your line with the tipping point up the line. It might seem like you want it to point down the line toward the end, but it’ll make sense in a minute. Then, tie on your worm hook.
When we say worm hook, we specifically mean the lure hooks marked as suck. They have a short shank coming from the eyelet, a ninety-degree turn in the shank, and then a big belly that allows the barb and pointy bit to align with the short shank section. Then, you need the lure or worm that you’re going to use.
Poke the tip of the hook into the "nose" of the lure and thread it in through the center about a quarter inch. Then, slide the lure down the belly of the hook until you can thread it onto the shank. When you straighten it out, it should make a straight line from the eyelet to past the aligned hook part.
Now, here’s the tricky part. You need to find the point in the lure's body that you can poke the exposed hook through and pull the lure tight and resulting in a straight worm. If you poke it through at the wrong spot, the lure will kink, or the tip will thread into the center of the lure and skip out of a bass's mouth.
Once you’ve done that, just lightly push the lure’s body up to barely conceal the hook’s tip. That is technically optional, but it helps a lot with snags.
When you’re done, you’ll have a rig that can cast far, penetrate the water’s surface with grace, and descend to your desired depth quickly and naturally. The worm will go nose-down and look as if it’s swimming to the bottom. This is why the rig is often used with paddle-tail swimbaits and lizard-style creature baits.
To use it, you just twitch your rod tip and reel it in a bit at a time. This creates the illusion of the lure bouncing nose-down across the bottom as if it’s feeding. You can also pull it in straight at a decent pace, but you lose a lot of action that way.
Another great benefit is that this is a “weedless” rig. The lure protects the hook from getting snagged on anything, but when a bass chomps down on it, the lure is pushed into the hook gap and you can set it without any issue.
Again, this is usually used with lures, but you can use live worms or even bait fish such as shad. As long as it’s long enough to get threaded onto the hook properly, it’ll work. You can even use dead bait fish in this manner to give them a little “life” again with the added benefit of a natural scent.
2: Kentucky Rig
The Kentucky rig is technically a catfish rig, but with the right baits, you can easily use it to snag bass. This is a natural bait rig, and it doesn’t work well with lures. So, keep that in mind. It’s also a more complicated rig than the Texas rig.
For this, you need a bottom weight of significant weight. We’re going to scale this down for bass. So, a 1-ounce or half-ounce weight is plenty good enough. Don’t tie it on, yet. Instead, attach a tri-swivel at the bottom of your line, and then tie on a leader that's about two feet in length to the inline swivel point that is left. With another leader that is about a foot long, tie on a bait-keeper hook, and then tie that onto the remaining 90-degree swivel point.
Next, slip on your weight. It moves freely. So, don’t worry about it moving around. Finally, tie another bait-keeper hook of your choice onto the end of the leader. Now, you have two hooks with a weight sliding freely between them.
This is used for bottom fishing. You can kick up dust around beds, troll with it when the fish are suspended low in the water column, or pull it through shallower waters, and your bait will stay elevated above the weight without floating back up. It’s great for worms, shad, and similar baits whether they’re alive or dead.
The issue is that you’re so close to the bottom that you can very realistically snag a catfish instead of your intended bass.
If you want to avoid tying all this together and having a limp rig, you can also buy them premade. With premade units, at least one hook is attached to a solid metal wire leader. So, it sticks out and away from the rest of the rig.
3: Alabama Rig
This is a controversial rig, and you might not even be able to legally use it in some of your local fishing spots. The Alabama rig focuses on mimicking an entire school of fish at once. Thus, it uses several hooks, and that’s not legal in some individual spots and even some whole municipalities across the country. Check your local laws before trying this one.
Unfortunately, this is also a rig you’re going to want to buy premade. Once you’ve bought one, know how it works, and know that you like it, you can technically make your own out of some cheap steel or aluminum wire, but it’s a bit complicated to start off doing that.
An Alabama rig is a wire frame that extends from an attachment point to have several straight wires bent off like a fan. At the end of each wire, a shiny blade and a hook are attached, and you thread on minnows, shad, worms, or synthetic paddle-tail lures. The wire rods are staggered to be longer or shorter than the ones adjacent to each rod. This creates the illusion of a school of fish moving, and the blades create plenty of flashes to draw attention.
Since this rig is so large, it tends to catch a lot of flora and it gets snagged easily. So, you’ll want to use it where you know you can retrieve it without a lot of headaches. Also, if your line snaps, you lose a lot more than you would with a Texas rig. Keep that in mind.
The pros of this rig are that you have several hooks and several chances to catch a fish on a single cast. The presentation is also optimized to the max if you have a clear retrieval line. Unfortunately, you also increase the chance of foul hooking a bass, and there are the drawbacks we mentioned above.
Every angler should have this rig in their repertoire whether they buy it or make it, but it should be used appropriately and legally.
4: The Drop-Shot
The drop-shot rig is one that picked up steam about five or six years ago. It’s simple, accurate, and creates a unique presentation without much effort.
For this, you need a drop-shot weight, a worm hook or bait-keeper hook, and bait or lures appropriate for your hook choice.
To start, determine where you want your lure to sit in the water column. This is easier to use if you’re in shallower water or fishing the bottom because you won’t have several yards of line dangling around when you cast. Let’s say you want it three feet off the bottom.
Take your hook, run it up three feet, and tie it on so the hook juts out perpendicular to the line. At the bottom, tie on your drop-shot weight. A drop-shot weight is a cylindrical weight with an eyelet coming out of the top.
Once you’re done, thread on your lure or bait, and cast.
The point of this rig is that the weight will drop straight down upon landing and drag the lure down with it very quickly. There’s very little side-to-side movement, and it will more or less put your lure exactly where you want it unless you skip the rig and send it in at an angle.
From there, your lure tries to float up, but it’s held down. So, it floats right up to the point that you want it at and gets stuck there. As you reel it in, it looks like it’s swimming through the water column.
5: Ned Rig
The Ned rig is another simple rig that just became popular a few years ago. It’s essentially the same as sticking a stick bait, minnow, or trick worm on an old-fashioned jig head. The only difference is that the shank that is usually barbed is straight for extra weight, and the head of the jig is flat. You can buy these special jigs in practically any big-box store or tackle shop.
Using the Ned rig is simple. You just thread your lure on enough for it to go all the way up the shank with the hook protruding proudly from the top of the lure, and you tie it on at the eyelet like anything else. All you have to do is bop it around on the bottom a bit.
It’s not all that different compared to a normal bare jig with a synthetic or minnow threaded on. It just has a different presentation due to the weight of the jig and the flat head. If you let it sit, it won’t wobble. It’ll stand your lure straight up. As such, it’s better to use this with short stick baits or minnows instead of longer, floppier options.
6: Whacky Rig
Finally, we’re going to finish this off with one last new rig that’s easy to use. The whacky rig is a weedless option that you can buy or make yourself. It’s a lot easier to buy it unless you have the means to attach a weed guard to a worm hook.
Essentially, you take a stick bait such as a Senko, and you hook it right in the middle of the stick bait. It sits horizontally on the hook. The weed guard then closes over the point of the hook.
There are a couple of modifications that can help you out or make it easier for you to set up, though. Since the hook only penetrates the width of the lure, this rig tends to result in a lot of ripped-up or missing lures.
You can help stop that by using a hair tie or rubber band to secure it on the hook and reinforce it. You can also opt to use this rig without a weed guard, but you risk snagging the rig on practically everything. So, you should only do that in very clear water with few obstacles.
This rig is great because it lets both ends of the stick bait worm flop around wildly. There’s tons of action without a bunch of setups, and it has proven to catch bass left and right.
Download the BassForecast Fishing App
If you enjoyed this guide on how to rig a worm for bass, make sure to check the BassForecast fishing app to gain more essential knowledge on factors that impact the bass fishing experience such as barometric pressure, bass fishing patterns, solunar theory, and more.


-1739275914.jpg)
.jpg)
.jpg)
.png)